Monday, January 14, 2013

REINTRODUCING THE AURATONE!

Work in progress...mixed media collage. It's really exciting to discover new applications for one of my favorite processes. Here I'm combining an Auratone print and a soldered Auratone pendant with a textured background and some found objects.


Maybe you'd like to expand your repertoire to include something that makes your photos look like vintage images with the gleam of gold akin to Edward Curtis' Orotones (circa 1920). It's a simple process...in fact, here's a little video demonstration. (Kits are available in My Shop.)

Auratone Pendants
The process also lends itself well to other media...it's a unique way to add another layer to your  paintings or other art...just take a photograph of the piece and then transform it into Auratone jewelry or prints.

A miniature Amadea Bailey painting transformed  into an Auratone pendant.

Photographer Nicol Ragland used Auratones to create this assemblage.


Wednesday, January 9, 2013

THE TEXTURE OF LIFE

If you're not already using textures or overlays in your Photoshop workflow, you're missing out on some serious fun! There are LOTS of sites offering texture downloads, some free (one of my favorites is Kim Klassen's Cafe), and others you pay for (like Flourish, Totally Rad, and 
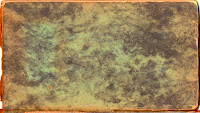
Flypaper Textures), but for the most part I prefer to use my own. They're not difficult to make...in fact, my very favorites are simply scans of the end papers in old books I have on hand, or handwriting (real or font) on the back of a stained recipe card. And you can make them as subtle or bold as you want.

Here's the original photo...the process works best when you have an open background area like sky or a wall. (Picture this: I spotted this kid running up the dune, and his dad was chasing behind him. There I went, running interference thru the sand with camera in hand, trying to get the shot without the dad in it. Ah, the lengths we go to!)


Here are some of my scans:


And here's the photo using the scans in just a couple variations.


Here's the basic tutorial...some knowledge of Photoshop is essential:


1) Open an image.

2) Open a texture file, copy and paste or drag into original image. If necessary, drag handles to cover the image. (I often add multiple texture layers to one file, turning them on and off to judge the various effects.)

3) With the texture layer selected, go to Blending Mode and choose Multiply, Soft Light, or Overlay.

4) Adjust the layer Opacity as you like.

5) Use the Eraser tool (or a Layer Mask) to remove texture from any areas you want left alone.

For advanced exploration and seemingly endless variations,  adjust the color and/or saturation with Hue/Sat adjustment layer(s).

Let me know if you have any questions!

Wednesday, January 2, 2013

HERE'S TO AN ART-FILLED NEW YEAR!

I have but one New Year's resolution, and you can probably relate: make art every day. Of course there's always room for improvement in other areas, but that goes without saying. This one I have to say again (and you might want to repeat after me): MAKE ART EVERY DAY. Doesn't have to be a masterpiece, doesn't even have to be finished, just stay in a constant state of creativity on some level...be it taking a photo, journaling, trying out a new technique, even doodling...just keep the juices flowing.

In 2012 I made some 2013 tabletop calendars incorporating photos I'd taken during the year. It was a fun way to merge some favorite images, graphic design, and the book and paper art skills involved in making them by hand.

Each calendar measures 6" wide by 6 1/4" tall, and the pages rest on a little built-in easel made of sturdy 300 lb. watercolor paper. Front and back covers were printed on Hahnemühle's William Turner textured matte fine art paper, and the monthly pages were printed on Epson Ultra Premium Presentation paper. The font is Mr. Moustache. The calendars were punched and bound using a (very affordable) Zutter punch. They fold flat and fit into a square envelope for wrapping or mailing.

Perfect for the holidays...this is a gift that keeps on giving throughout the year. And don't you think it beats a store-bought calendar...so much more personal! Why not start planning yours now?

My 2013 Calendar
February's Page

July's Page

Back Cover

This calendar is now available in MY SHOP...2014 calendars will be available in November 2013.