Friday, May 21, 2010

FONT FLAG FRIDAY #11

Do these two fonts work together? I'm not sure as a combo they fall within any graphic design guideline...each has such a strong personality they could fight with each other. My brain says "No, no, no!" but for some reason my eyes say "Yes!"

The idea of making font flags is to play with type combinations as you create your own reference library so that when the time comes to design a layout—an invitation, poster, business card, holiday greeting, whatever—you have them at your fingertips.

Let's imagine my imaginary museum group asks me to design a poster for an upcoming event and they need it yesterday. In almost no time at all, it's done. While this mock poster incorporates the font name of Bauhaus, I think the combination would work just as well for an invitation to a party or even a wedding. What do you think?

(Font Links: P22 Bauhaus, P22 DaVinci)

Wednesday, May 19, 2010

WEDDING WORLD WEDNESDAY: CANDLE FAVORS


Simplicity itself, and romantic and evocative when illuminated, candle favors are perfect for individual place settings but can also be grouped together to form an unusual centerpiece. Personalizing each candle with a beautiful photograph of the couple makes it a true keepsake.

Materials:
     - Matte photo paper
     - Scissors or paper cutter
     - Double-sided tape
     - Candle and glass cylinder
     - Ribbon, cord, or fiber (optional)

1. Create a page layout equal to the height and circumference of the glass cylinder, plus 1/4 inch for overlap. Incorporate a photo of the couple with their names and wedding date. (Font: Shelley Allegro)

2. Print, trim if necessary, and wrap the paper around the cylinder. Secure with double-sided tape.

3. Tie a length of ribbon, cord, or fiber around the cylinder if desired.

4. Insert candle.

Thanks to Gia and Pete Hettish!

Find this project and others in my book, The Art & Craft of Keepsake Photography: Engagements and Weddings, available in my website shop and through amazon.com and other online booksellers.


Monday, May 17, 2010

MONDAY MORNING MUSINGS - COMING SOON!


To quote Garth, the very special man in my life, "I'm in a constant state of photography." A weekend getaway yielded this image that I shot, transformed into a thank-you note printed on watercolor paper, and sent to the hotel manager, a personal friend who pulled out all the stops in treating us to a dreamy idyll.

The grounds were lush with exquisite gardens, and Garth spied an AMAZING ivy-type vine that I hadn't noticed; once he pointed it out, I knew it would make a wonderful border. Now I'm hoping I might be able to sell the cards in the hotel gift shop.

This is a preview of the types of kits I'll be offering for sale in the weeks ahead. Each kit will contain various Photoshop elements such as (shown here) a template for a folded thank-you note, a swirly vine brush, a vignette, and a mock embossed border...just add your own photo, print, and share. Of course detailed step-by-step instructions will also be included.

Stay tuned!

Wednesday, May 12, 2010

WEDDING WORLD WEDNESDAY: STOCK PHOTOS

Advertising agencies, Web designers, graphic designers, and lots of other entities frequently take advantage of stock photography – images that aren't taken for a specific client or purpose but are used and reused for multiple assignments.

For weddings, take some stock images of flowers, champagne glasses, couples' hands, rings, wedding cake brides and grooms, etc., that you can then use to create themed stationery ensembles: invitations, response cards, reception cards, and guest books.

Taking stock shots is fun; you have complete control and can get really creative, and you can also transform them into image transfers or manipulate them in Photoshop. I'm constantly repurposing my images. (Just between you and me, the old suitcase you see in the latest of the "Flight" series posted yesterday is something I shot about ten years ago; I knocked out the background and added it as a layer with a drop shadow.)

For baby-themed stationery – shower invitations, thank you notes, and photo albums – I took some stock shots of baby shoes ("painting" boy and girl versions in pink and blue in Photoshop), a teddy bear (again, "painting" a boy version with a blue ribbon around its neck, a girl version with pink), and a rubber ducky (unisex!).

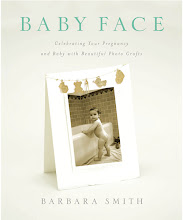
These projects and more are detailed in my books, "The Art and Craft of Keepsake Photography: Engagements & Weddings" and "Baby Face: Celebrating Your Pregnancy & Baby with Beautiful Photo Crafts," available in My Shop and at amazon.com and other online booksellers.

Friday, May 7, 2010

FONT FLAG FRIDAY #10


Contrast is the #1 consideration when combining font faces in a layout. Start with two VERY different fonts and/or type sizes. Here I combined P22 Typewriter and P22 Dearest.

P22 is hands down my favorite font house. Meticulously designed professional typefaces, often imitated  but never equaled. Sign up for their newsletter and/or become a Facebook fan to be among the first to hear about specials on existing fonts and introductions to new ones. And check out their shop…font-based apparel, glassware, publications, and other stuff…even a doormat!

Because I love you, here's a mini Photoshop tutorial for turning a photo into a sketch (as I did in this layout).  This works better with some photos than others, so play:

1. Open an image file and duplicate the background layer (Layer>Duplicate Layer>OK).

2. With the duplicate layer highlighted in the Layers palette, go to Image>Adjust>Desaturate, then go to Filter>Stylize>Find Edges.

3. In the Layers palette, change the blending mode for the duplicate layer from Normal to Overlay.

Voilá!

Wednesday, May 5, 2010

WEDDING WORLD WEDNESDAY: SELF PROMOTION


An "envelopment" wrapped in ribbon turns a simple flat card printed on a nice heavyweight stock into a gift.

I think word-of mouth is by far the most effective means of promotion, especially for a wedding photographer. Most people ask their friends for referrals before choosing an unknown entity from a directory or magazine.

So, after you've shot a wedding, here's a simple way to maintain the special connection you've cultivated with your clients so that they'll be sure to refer you, and it will even keep them coming back for more: As each anniversary approaches, send them a special card featuring a photo from their wedding and include a freebie or gift certificate for a discount on an anniversary photo session.

Next week I'll share another great tip for "guerilla marketing"... an inexpensive and very effective idea I bet you'll want to incorporate into your existing work flow.

Find step-by-step instructions for this project and others in my book, The Art & Craft of Keepsake Photography: Engagements and Weddings, available in my website shop and through amazon.com and other online booksellers.


Tuesday, May 4, 2010

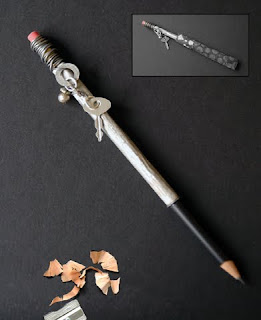
PENCIL OR OBJET D'ART?

Think about the sensory considerations of the humble pencil...so basic, familiar, even comforting; the appearance, as form meets function, minimalist, perfect; the woodsy sound of graphite against pulp; even the organic smell of a freshly sharpened pencil.

But why stop there? Now available in my shop...matte black pencils wrapped with handmade papers and embellished beyond reason. Each pencil or set of pencils comes in a complementary origami-folded quiver and is accompanied by a precision magnesium sharpener.

Gear Head (shown) - features silver Joss paper, soldering wire, and "found" metal objects (think Father's Day!)

Origami - set of 5 pencils made with origami papers; one pencil features an origami crane dangle

Waxing Rhapsodic - set of 3 pencils with an encaustic (beeswax) theme; one pencil features a jeweled dangle

Boho - set of 4 pencils, each with a different gem-toned paper and coordinating bead dangle

Zen (shown) - 1 pencil featuring an Auratone Buddha "portrait" and bead dangle

Now available in my online shop!

(Note: A portion of the proceeds from this item will be donated to the charity of my choice.)

Wednesday, April 21, 2010

WEDDING WORLD WEDNESDAY: AN ELEGANT INVITATION

(Click to enlarge.)

This deluxe invitation is easier to lay out than it looks. In Photoshop, the opacity on the image layer is lowered, then layers of text are added. By putting text blocks and elements on separate layers, they can be edited and moved independently as you finesse the design.

Varying the size of the text within a layout creates visual interest. Enlarging the initials of the bride and groom adds contrast, an important element in graphic design. Invitations look best with lots of "white space" within and surrounding the text. Airiness adds elegance and prevents the piece from looking too busy.

The final image is printed on 8 1/2 x 11-inch photo paper, trimmed to a 6 1/4-inch square, then mounted on 90-pound hot-pressed watercolor paper (available at art supply stores). A sheer ribbon edged in gold holds additional components of the stationery ensemble in place behind the invitation, and a black linen envelope pulls the look together.

(Fonts: Shelley Allegro and Bank Gothic Light)

Find step-by-step instructions for this project and others in my book, The Art & Craft of Keepsake Photography: Engagements and Weddings, available in my website shop and through amazon.com and other online booksellers.

Monday, April 19, 2010

COMING SOON!

(Click to enlarge.)

Coming soon...digital graphic design kits! Transform your favorite photos into faux mixed media masterpieces to use as wall art, greeting cards, promotional materials, scrapbook pages, gifts, you name it.

Kits include textured backgrounds, frames and borders, Photoshop brushes, alphabets, and much much more.

(Any Photoshop CS version required.)

Wednesday, April 14, 2010

WEDDING WORLD WEDNESDAY: THANK-YOU NOTES

(Click to enlarge.)

A thank-you note is the perfect place for a favorite photograph from the wedding. The inside is usually blank or printed with a brief thank-you, affording sufficient space to accommodate a hand-written message.

Matching the three-pixel “stroke” of color around the image and the font color to the decorative paper lining the envelope creates a sense of unity. 

If you're a professional photographer, don't forget to add your contact information to the back of the card...free advertising to a targeted audience!

Here's a fool-proof way to line an envelope:

MATERIALS:
- premade envelope
- decorative paper for the lining
- glue stick
- paper cutter and/or craft knife or scissors
- bone folder (for burnishing)

1. Cut the lining paper to 1/8 inch smaller than the envelope's outside width and equal to its height with the flap up.

2. Insert the lining into the envelope and trim around the flap.

3. Remove the lining and trim the bottom edge to the width of the glue strip on the flap of the envelope.

4. Insert the lining into the envelope, making sure to push it all the way in. Apply glue to the inside of the flap portion of the lining, then apply pressure to the glued area to adhere it to the envelope.

5. Fold the flap down and burnish the crease so that it lays flat.

Find this project and others in my book, The Art & Craft of Keepsake Photography: Engagements and Weddings, available in my website shop and through amazon.com and other online booksellers.


Monday, April 12, 2010

DON'T FORGET...MOTHER'S DAY IS MAY 9TH!


Nothing could be any more perfect for a Mother's Day gift than an Auratone keepsake necklace, earrings, or charm bracelet featuring one or more images of a loved one.

Check them out here in my shop. Whether you buy a kit (from $25-$40) and do it yourself or send me the picture and have me make it for you (from $75-$175), order now, before it's too late. For custom orders, the deadline is April 23rd.

Friday, April 9, 2010

FONT FLAG FRIDAY #9

(Click to enlarge.)

A 100% digital scrapbook page layout featuring photos of my darlin' granddaughters, Leila and Hana, along with some of my very favorite fonts.

I love how you can choose fonts that so vividly reflect the “mood” of the message you wish to convey. Here Texas HeroOne Fell Swoop*, and VT Portable Remington* unite to create a mood of casual elegance befitting a very special spring day.

*Free font alert!

(Thanks to Jessica Sprague, Jen Wilson, and Mary Ann Wise for all things scrapbooking.)

Wednesday, April 7, 2010

BABY FEAT


(Click to enlarge)

The design for this birth announcement came about quietly, simply, organically...just playing really.

Shoot...tear...fold...collect...combine.

Sunday, April 4, 2010

FLIGHT


Just sharing a couple new photos...I think this back staircase is the main reason I moved into my apartment, I even dream about it. I'm working on a series entitled "Flight."

Friday, April 2, 2010

FONT FLAG FRIDAY #8


(Click to enlarge.)

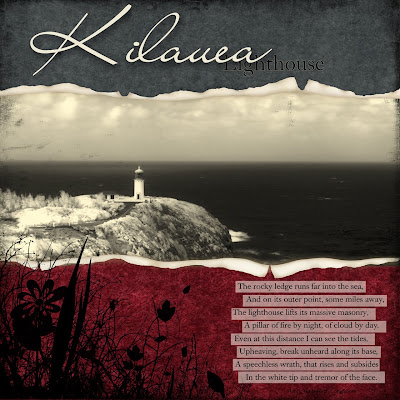
One of my favorite spots on Kauai...even on stormy days. In this case, shooting digital infrared (or NIF–"near infrared") enhanced the dramatic look, darkening the clouds and water and lightening the foliage.

Choosing two very different fonts, in this case Liana and Caslon Book BE, is one of the simplest and most effective design principles to remember when combining type faces in a single layout. Doing so supplies an element of contrast, and, simply put, our eyes like contrast. Strengthen that effect even more by contrasting type size and/or weight as well.

Here the use of Caslon was repeated in the quotation (by Henry Wadsworth Longfellow) for continuity and—importantly—readability in a smaller size.

(Thanks to Jessica Sprague, Trish Jones, Sweet Shoppe, and Jason Gaylor for additional Photoshop elements.)

Monday, March 29, 2010

INTRODUCING...AMADEA

Yet another example of Photo Fusion...this time combining painting, photography, the Auratone process, and jewelry making.

My friend Amadea Bailey (NOT pictured here!) and I have been talking about doing this for a few months now and so here it is...we've launched our line of jewelry! A perfect collaboration...Amadea is an amazing (and world renowned) expressionist painter, and it turns out her work looks incredible when transformed into Auratone pendants.  Check it out here!

We've decided to take our beautiful but shabby (and bald) mannequin around town to shoot some photos of her wearing the jewelry in various local settings...the beach, shopping, who knows.  I think we might even make a silly video...stay tuned!  Oh...and she definitely needs a name...any ideas?

Also be sure to visit Amadea's website ...she's an inspiration, the real deal, and I know you'll be impressed!

Friday, March 26, 2010

FONT FLAG FRIDAY #7 - CARTE POSTALE


(Click to enlarge.)

For a baby shower held in a charming French restaurant, a mock “French postcard” was the perfect thank-you note. Taking individual table shots meant that each guest seated at a particular table could be featured on a customized postcard.

Once you've created a postcard template, you can use it again and again for a multitude of purposes, adapting it to suit your needs. I created an African version to complement photos I took in Kenya, changing “Merci” to “Jambo,” which means “Hello” in Swahili. I also have a Hawaiian version that says “Aloha” and one that says “Mahalo,” which means “Thank you.” Instead of the typical line you see separating the mailing address from the message, here I substituted a vertical line of type with the date of the event and my copyright information.

It's usually not a good idea to combine two such highly stylized fonts as Bodoni Classic Deco and P22 Cezanne, but in the postcard layout it somehow works, mostly because there's plenty of  space between the two fonts. This goes back to my earlier advice to just play with combinations until you hit one that makes you go “Yes!” regardless of the rules. Bodoni Classic Deco is a rule breaker in itself, the true Bodoni being a pure and unembellished typeface (as used for “Postage Stamp Here”).

I'll be including “How to Make a Postcard Template” in my upcoming Creating Photoshop Templates video workshop.

Wednesday, March 24, 2010

WEDDING WORLD WEDNESDAY: SAVE-THE-DATE CARDS

Save-the-date cards are the perfect  excuse for sharing one of those great photos from the engagement photo session!

The save-the-date card is a thoughtful way of notifying guests of the wedding date and location well ahead of time–three to twelve months–so they're able to plan accordingly. Although they've recently become pretty much de rigueur for just about any wedding (except an elopement ;-)),  they're especially appropriate for destination weddings and those for which guests will be coming in from out of town. Often a simple flat card, save-the-date cards can also take the shape of an elaborate program of events, travel routes, and suggested accommodations, although they are definitely not a substitute for the invitation itself.

Here's a simple yet elegant folded card using a printed vellum overlay and vellum envelope. If you're making the cards yourself, be sure to purchase vellum that's suitable for your printer (i.e., inkjet compatible). Action Envelope is my favorite resource for vellum envelopes in just about any size, shape, and color.

Since most printers don't allow you to print to the edge of the sheet, we'll use a larger sheet, then trim to give the effect of what is known as a "full bleed."

1) For a 5" x 7" folded card: In Photoshop, align the top of a 5" x 7" photo along the horizontal center line of a letter-size file (8 1/2 x 11"), then print on a letter-size sheet of heavyweight paper.

2) Remove the sheet from the printer, then flip, rotate, and reinsert into the paper feed.

3) Type the save-the-date information in the same area but on its own layer, then turn off the photo layer and  print the inside text.

4) Fold* the sheet in half and trim the sides and bottom.

5) Print the vellum overlay in the same manner, with the text on its own layer and positioned so that it falls within the photo area.

6) Fold* and trim the vellum overlay.

7) Apply a bit of glue along the top edge of the card and adhere the overlay.

*Note: For clean folds, use a bone folder to score and burnish.

Oh, and if you're a professional photographer, be sure to add your contact information (tastefully, of course) to the back of each card...free and effective promotion!

This and many other projects are detailed in my book, "The Art & Craft of Keepsake Photography: Engagements & Weddings," available in my website shop and through online booksellers like amazon.com.

Monday, March 22, 2010

MONDAY MORNING MUSINGS


Introducing Monday Morning Musings...wherein the blogger blogs about whatever strikes her fancy.

This morning it's to INSPIRE and ENTHUSE, and to that end, my Photo Fusion Facebook Fan Page is now open for business!

In addition to my blog feed with tons of FREE information, I've added lots of photos, some videos, and a few discussion topics awaiting your participation. Much more to come, including links to my new video workshops. My hope is for the page to become a living, breathing thing as we share our passion for all things photographic. It's eclectic, exciting, and effervescent (shrug...I can NEVER resist the opportunity for a little alliteration)!  So join the fun, become a fan, and please do tell your friends!

Coming up...Wedding World Wednesday (groan, there I go again!):  Tons of tips on wedding and engagement photography—whether you're a bride, groom, guest, or pro shooter—and even Photoshop tutorials on what to do with those great images.

Friday, March 19, 2010

FONT FLAG FRIDAY #6...and some free advice!


Killing three birds with one stone here...a new font flag with four (!) different typefaces, using my iPod hair experiment, and getting something off my chest.

Okay, first things first: The fonts are Lithos Pro (an all-caps typeface); Apple Chancery (script); Mrs. Eaves (for very readable yet elegant text, and probably my favorite and most-used font family); and Prints Charming (which I chose because the “O” echoes the shape of my smilin' face, laugh lines and all!). Four very different personalities, yet they comfortably cohabit this layout without chaos.

Now, as far as getting something off my chest...I cannot tell you how many fabulous, wonderful, sophisticated, upscale, and stylish ads, websites, articles, and captions I have seen where an apostrophe is arbitrarily plunked down to form the contraction “it's” when it's just plain wrong. There is nothing wrong with the word “its” as long as it's used properly (as in “Punctuation rears its ugly head.) I know, I know...picky, picky, picky. But it's just one of those things that makes my heart sink as my (and I'm quite sure other people's) estimation of the professionalism of the entity involved sinks in direct proportion.

There, I feel MUCH better!

Friday, March 12, 2010

FONT FLAG FRIDAY #5


I swear this isn't really my desk...it's a bunch of Photoshop layers. I scanned some distressed papers, a blank Post-It note, an old file folder, a broken grease pencil, and a contact sheet I recently came across (from the old days...film!), threw in some Photoshop brush stains and splats, then chose a couple fonts I thought would work well together in this grungy layout: FG Nina, to replicate a note printed by hand, and VT Portable Remington...my favorite old typewriter font (and it's FREE!).

A fun example of "photo fusion"...in this case film and digital virtually collide!

Tuesday, March 9, 2010

NEW OLD FRIENDS


I am not a photojournalist...I'm personally uncomfortable getting in a stranger's face, so to speak, but thankfully there are others who are not...and my newest old friend, Barbara Hayden, is one of them. Her love of humanity drives her art, and she has an unerring eye for catching those authentic moments. She's been shooting since the 70s, from the east coast to the west, and I think her photos are a national treasure.

Check them out here...make sure your sound is on, choose to view in high quality, and enjoy!

Monday, March 8, 2010

NEGATIVE SPACE

Inspired by last night's 82nd Academy Awards...or more precisely the logo for the 82nd Academy Awards. My attention was drawn to the space surrounding the font characters...it was filled with a blurry moving image. Exquisitely designed fonts like this one (I'm not sure what they used...I chose Big Caslon, above) feature lines and curves that make the "negative space" as elegant and eye-catching as the typeface itself.

Of course, I was watching mostly for the dresses...my favorite: Demi Moore's peachy Versace!

Sunday, March 7, 2010

GRUNGE NAILS

Off point (again), I digress...well, it is Sunday, after all. So I gave myself a manicure the other day with my usual coat of dark polish. Once it had dried, thought I'd lighten it up a bit with a coat of bronzy shimmer. Hated it the next day so got out the polish remover and after a couple swipes noticed the cool distressed look...kind of like acid etching on paint. Showed it to my daughter who said, "Wow, Mom, it looks just like your art!" Now I can't wait to try other colors.

The perfect foil to the oh-so-proper French manicure...grunge nails. Wouldn't it be funny if it caught on?!? Well, don't forget you heard it here first!

Thursday, March 4, 2010

FONT FLAG FRIDAY #4


I know, I know...it's Thursday, but I couldn't wait to share this with you.

Some font packages include "extras"...related decorative elements and even sketches that can be used to complement your layouts in myriad ways. Here I chose the P22 FFLW Exhibition font...I used one of the 72 (!) extras to create the background which I then grunged up a bit. This geometrically-designed extra provides the perfect border for a photo...others form continuous linking borders. Very, very cool!

And now, for your listening (and viewing) pleasure...pump up the volume and click here.

Monday, March 1, 2010

FOLLOW THE DOTS


Don't you love thinking about how one thing led you to another thing which led you to another thing and on and on until here you are? Like following the dots of our creative experience that make up the picture that is us? Nothing is wasted!

Shortly after I began shooting in earnest, I discovered alternative Polaroid processes and dove right in. Though the technique became a bit over-used, I still love the fresco-like texture and painterly effect. A few years later, after I had learned to use Photoshop, I scanned my favorites, so even though Polaroid is no longer making instant film, I can use my transfers forever.

Now my passion has turned to photo encaustic, and my eyes are constantly on the prowl for likely candidates. I had made this little booklet of Polaroid transfers as a promotion piece. The pages are interspersed with vellum containing text. Recently I took the book apart, edited and reprinted the title page, then dipped the imaged pages in encaustic and rebound the book. It's a great little table-top piece...I love the tactile quality and the way the light shines softly on the wax. Imagine your photos complemented by some of your favorite quotations, poems, or lyrics.

Very simple, very satisfying. Order my photo encaustic kit and see for yourself.

Friday, February 26, 2010

FONT FLAG FRIDAY #3


Short post today as I'm a little under the weather this morning (sniff). Combining Brush Script with Lemonade (this one's free!) is perfect for a kid's birthday party invitation or any casual layout. Two very different fonts that go together like peanut butter and jelly.

Oh, and yep, that's another clipping mask you see...I'm tellin' you, once you start using them it's hard to stop!

Thursday, February 25, 2010

WAXING NOSTALGIC


(Click for a closeup view.)

Lately I've been scanning old album covers as the basis for new encaustic pieces. Because the covers are wider than my scanner, it takes two passes, then I paste them together in Photoshop. You might want to use this technique using your own favorite albums...of course you could scan CD covers, but I like the worn quality of old albums.

"Performance" is one of my all-time favorite films. Directed by Donald Cammell and Nicholas Roeg and starring Mick Jagger and James Fox, it has a kick-ass sound track featuring not only Mick but Ry Cooder, Randy Newman, Buffy Sainte-Marie, and Merry Clayton. The film explores themes espoused by poet Jorge Luis Borges about the nature of identity, duality, and time, and references to Borges are strewn throughout the movie.

This album jacket has great photos of Mick, front and back, in the two personas he displays in the film.  I used pages from a Borges anthology as collage materials to reinforce the connection. 

The term "wax" also applies to record albums.  This is because early phonograph cylinders were made of wax, eventually replaced by vinyl. You still hear records referred to as wax, although less and less frequently.

Altered covers make great wall art for you and yours, but I don't suggest selling them...the original images are undoubtedly copyrighted. This is just about making art for art's sake.  Waxing on wax, so to speak.

You can order my Photo Encaustic Kit here...it's an easy way to get started.

Tuesday, February 23, 2010

WAKING UP AND SMELLING THE ROSES


It's almost always the simplest things that make me feel the deepest pleasure...like a vase of flowers beaming softly in the early morning light.

Shot a little video of my good friend, flower photographer extraordinaire Pip Bloomfield (check out her amazing work here), and she gave me these gorgeous roses as thanks. Thank YOU, Pip!  XOXO

Friday, February 19, 2010

FONT FLAG FRIDAY #2


Choosing fonts for a layout falls within the realm of graphic design, and although in the strictest sense there are lots of "rules," the choice of a font, or fonts, is actually somewhat personal and therefore hard to define. When you choose the right typeface, it just seems to "go" with the image and the emotion you wish to communicate. So just play with different faces until you hit one that makes you go "Yes!" Common sense prevails...if it's for the body of an invitation, you want a very readable font, but if it's for a banner or heading, you can go with something that conveys a strong feeling...romantic, grungy, scary, feminine, masculine, etc.

When combining two fonts in a single layout, it's most effective to choose two very different styles...often a script, calligraphic, or handwritten-type font along with a more classical font; a strong, bold font with a contrasting lightweight font; or one with serifs (those little curly-cues or lines you see at the ends of letter forms) alongside one without (ergo, sans serifs), in opposing weights.

Here I've chosen Letterpress Text and P22 Cezanne. I like Letterpress because it has an organic quality but is still highly readable. With its subtle level of decay and opacity, it emulates the look of the letterpress printing process in which a raised surface is inked and pressed into a sheet of paper. It's especially effective when printed on a heavyweight textured digital paper, and you can even take it further by adding an embossed layer style in Photoshop. (For detailed instructions, see my January 13th post entitled "Personal Fave.") Order Letterpress here at myfonts.com.

I have to admit that although I use P22 Cezanne in my own marketing materials, I'm a little tired of seeing it everywhere, but you can order it here at my very favorite foundry, P22.  And while you're there, check out their shop and sign up for whatever you can...they are a great resource for not only fonts but gifts, ideas, and inspiration. Other fonts with a similar flair to P22 Cezanne (available elsewhere) include AL Verdigris, Jane Austen, Emily Austin, Dear Sarah, Baker Script, Lamar Pen, Houston Pen, and Jefferson.

Friday, February 12, 2010

IT'S FONT FLAG FRIDAY!


Finding the right font to go with a photo layout can be challenging, and finding two very different but complementary fonts even more so. That's why I like to make "font flags"...digital visual journal pages where I experiment with different combinations and then save what I like for future reference. Besides that, they're fun to make...you can even print and frame them. Thought I'd share mine with you each Friday, along with links so that you can purchase the fonts you like...but mostly I just want to inspire you to experiment on your own.

Caslon is a classic and very readable font "family," meaning it's available with similar characteristics in several sizes and weights...e.g., regular, bold, italic, and bold italic. Some families also include condensed, small caps, and other professional styles. Purchase Caslon at Linotype, myfonts.com, and elsewhere.

Liana is a script font that's easy to read, elegant, feminine, and has a handwritten character that's perfect for letters and informal invitations (and Valentines!). Available from myfonts.com.

Wednesday, February 3, 2010

AND SPEAKING OF CLIPPING MASKS...

In this morning's mail, here's a promo from Anthropologie...a perfect example of using Photoshop clipping masks as described in yesterday's post.  (Click to enlarge.)


Monday, February 1, 2010

PHOTOSHOP CLIPPING MASKS

Here are two examples of clipping masks. You see them used on billboards and in magazines...they're effective, simple, and a really fun way to use your photos in your layouts...be it greeting card, blog banner, promo piece, calendar, scrapbook page, mixed media, whatever.

Basically, in Photoshop, you want a photo on one layer and text or a shape on the layer beneath it in the Layers palette. Then hold down the Alt/Option key, hover over the line separating the two layers, and when you see the double circle icon, click and, voilá!

For fonts, it's best to choose a "fat" one (I love Bauhaus Heavy) or the image won't show, and make sure the piece itself is big enough to "read" the effect...otherwise it's a wasted effort. In other words, a business card may be too small, but a greeting card is just right...and anything bigger is even better. Use the Move tool and the Transform feature to tweak things to your liking.

Thursday, January 28, 2010

PHOTO L.A. PART 2


Another artist who caught my attention at Photo LA is Alchemy Studio...actually, a collaboration of artists Carol Panaro-Smith and James Hajicek. In their extraordinary work, photogenic drawings, where plants are exposed in contact with hand-coated light sensitive paper, are combined with mixed media to produce art that is both organic and mysterious. Carol and James are dedicated advocates and instructors of antiquarian photographic printing processes, and Carol teaches both photo-based mixed media and artists' book workshops at the community college and in their  studio in Phoenix, Arizona.

Although no workshops are currently scheduled, you can keep up with Carol via her blog.

(Artwork by Alchemy Studio can be purchased through Kevin Longino, a private dealer specializing in contemporary photography.)

Monday, January 25, 2010

CAMBRIA DREAM


(Click to enlarge)

Took this shot a few months ago in Cambria, one of my favorite little towns along the Central Coast. It was a romantic getaway...and while the romance got away, this image endures. Adding a meaningful quote and some subtle journaling enabled me to encapsulate the memory in an evocative way. Translating life's experiences into art is organic, authentic, and cathartic.

This type of photo fusion using digital layers, including textures and masks, will be the subject of one of my upcoming video workshops.

Friday, January 22, 2010

PHOTO L.A.


Went to Photo LA last Sunday and had a chance to catch up with some of my favorite photographers' newest work. Foremost among them is Brigitte Carnachon, whose sensuous handpainted images of flowers and nudes have long held me sway. Her latest body of work, "Floating World," is equally mesmerizing with a romantic, mysterious quality of time gone by. Inspired by poems written by Japanese women throughout the ages (and whose names are calligraphed in red), each image is a testament to the beauty of the natural world.

This is my idea of photo fusion at its most subtle yet most powerful.

(Ms. Carnachon's photographs are available through Kevin Longino, a private dealer specializing in contemporary photography.)

Wednesday, January 20, 2010

HAPPY BIRTHDAY PART 2

And here she is today...my darlin' daughter (and my favorite model)!


HAPPY BIRTHDAY, ERIN!

In honor of my daughter's birthday today, I thought I'd share a photo taken of me and my husband back in the day by our good friend Reed Fenton. Yep, we had lots of hair...as did Erin when she was born!  I won't tell you the date, but let's just say it was long before Cindy Crawford and Demi Moore graced the covers of Vanity Fair!


GOOD FOR A LAUGH - ENJOY!

In one of my former lives I was a court reporter...mostly personal injury deposition work. When someone is involved in an accident, they're asked to describe what happened in as few words as possible on the insurance accident form. The following quotes were taken from these forms and were eventually published in the Toronto Sun newspaper:

"The pedestrian hit me and went under my car."

"In my attempt to kill a fly, I drove into a telephone pole."

"I had been driving in my car for forty years when I fell asleep at the wheel and had an accident."

"I was sure the old fellow would never make it to the other side of the roadway when I struck him."

"The pedestrian had no idea which direction to go, so I ran over him."

"I saw the slow-moving, sad-faced old gentleman as he bounced off the hood of my car."

"The telephone pole was approaching fast and I was attempting to swerve out of its path when it struck my front end."

"The other car collided with mine without giving warning of its intentions."

"I was thrown from my car as it left the road. I was later found in a ditch by some stray cows."

"The guy was all over the road; I had to swerve a number of times before I hit him."

"Coming home, I drove into the wrong house and collided with a tree I don't have."

"I pulled away from the side of the road, glanced at my mother-in-law, and headed over the embankment."

And my favorite:  "An invisible car came out of nowhere, struck my vehicle, and vanished."

I hate it when that happens!

Monday, January 18, 2010

PHOTO FOLIOS


Indulge your love for photography, alternative processes, and handmade or decorative papers...create mini folios and fill them with a collection of some of your favorite images transferred onto watercolor paper. Give them as gifts, sell them at craft fairs, or set up an online shop at Etsy.com.

Mine are Polaroid image transfers, but you can use Bonny Lhotka's alcohol gel transfer process, or just print your images on a nice toothy fine art digital paper like Somerset Velvet or Museo II...maybe tearing them against the edge of a ruler instead of cutting them to add the look of a deckled edge.

If you'd like detailed instructions for making the folio, say the word and I'll send them to you!

Friday, January 15, 2010

DESERT SYMMETRY

Just got back from the desert...went to Joshua Tree with good friends and fellow photogs  Jeanne and Steve Gadol. Although I love the soft neutral tones of the desert palette and the stark landscape, I just couldn't seem to find "my shot." Then I remembered a lesson from my photographer teacher Bob Ware at Santa Monica College way back when...he had us choose a 10-foot square area, anywhere, and shoot an entire roll of film there, making each shot count.  It forced us to really see, not just look, and to use concepts of composition and depth-of-field to each shot's best advantage.


Wednesday, January 13, 2010

PERSONAL FAVE


I thought I'd share my very favorite technique for making invitations and announcements. This is the only technique that appears in both of my books, in Keepsake Photography as a wedding invitation and in Baby Face as a birth announcement (featuring a photo, shown here, taken by Jimmi Johnson).

Letterpress printing, a technique in which a raised surface is inked and pressed into a sheet of paper, is labor intensive and requires not only a letterpress but a high degree of skill and craftsmanship. But by combining the right fonts with a heavyweight textured digital paper, you can create a faux letterpress effect with similar appeal. In both examples I used Arches Infinity Textured paper (355 gsm) and Letterpress and P22 Cezanne fonts. Although the Arches Infinity line has been discontinued, it can still be found; a comparable substitute is Museo II (365 gsm).


To add the letterpress texture, type the text as a Photoshop layer. Go to Layer>Layer Style> Bevel and Emboss. Select Emboss, choose 'down' as the direction (which creates "debossing"), and adjust the depth and other settings until it looks good to you. I like to keep it fairly subtle. Colors other than black look best because the shadows show up better...for instance, a nice dark brown. Aside from the Letterpress font, try Bank Gothic, Adobe Caslon Pro, Copperplate, Lithos Pro, Mrs. Eaves and Papyrus.